A: Prepare your equipment
1. Measure and cut
your tinfoil (See figure 3)
 |
| Figure 3: Approximate Size of Tinfoil |
Note: Approximately 4 inches long and 1.5 inches wide is a
good amount
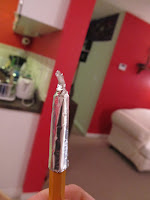
2. Wrap the tinfoil around a pencil
(See Figures 4 and 5)
 |
| Figure 4: Starting to wrap the tinfoil around the pencil |
 |
| Figure 5: End Result of Wrapping |
3. Fold the tinfoil
down so the top is sealed (See Figure
6).
Note: Gently open the flower. You need to keep the anthers and
filaments (see figure 7) intact and ready to use.
When you look at this picture, take special not of the "fuzzy", dusty yellow smaller "stick" pieces. These are the anther and filament - i.e. the male part of the flower. The yellow dust is the pollen that is especially needed while completing the next part of the experiment.
 |
| Figure 7: Opened white petunia flower |
C. Prepare the Closed
Red Petunia Flower
1. Open the red petunia flower
2.Remove the red flower shell so only
the anthers, filaments and style are left (see Figure 8)
(The anthers and filaments are the smaller "stick" pieces with white tops, while the style (i.e. the female part of the flower) is the one longer stick with a green top in this case).
 |
| Figure 8 |
3. Remove the anthers and filament
(see Figure 9), but leave the style.
(See what I was talking about? Well, hopefully you do!)
 |
| Figure 9: Prepared Red Petunia |
D. Fertilize with Pollen
1. Remove one of the anthers and
filaments from the white petunia (See Figure 10).
 |
| Figure 10: Removing the anther and filament |
Note: The top of the male flower part (the anther) is covered in
pollen. (Remember we talked about that earlier. The pollen is all of that yellow dust stuff).
2. Rub the RED petunia’s style with
the pollen from the WHITE petunia’s anther (See Figure 11)
 | ||||
| Figure 11: Mechanically fertilizing with pollen |
E. Seal with Tinfoil
1. Take the prepared tinfoil and
gently pull it over the fertilized red petunia’s style (See Figure 12 and 13).
 |
| Figure 12: Putting the tinfoil on |
 | ||
| Figure 13: Pulling the tinfoil | down to a suitable level |
2. Pinch the bottom of the tinfoil
together.
Note: This will prevent germs and unwanted particles from getting
inside and ruining the experiment.
F. Label the Finished
Product
1. Rip a sticky note in half.
2. Write down what was crossed
together on the note (See Figure 14).
 |
| Figure 14 |
3. Loosely wrap the note together
under the experimented petunia part (See Figure 15).
4. Put a piece of tape on the end of
the note to make sure it sticks together.
In a week or two, the tinfoil can
be removed. If done correctly, a small hard seed pod will be found underneath
the tinfoil (See figure 16).
 |
| Figure 16: Attached hard seed pod. |
When this
matures, it will actually burst (See Figure 17) leaving a plethora of “new
breed” flower seeds (See Figure 18). The seeds can turn into pink, tie-dye, red
or white flowers; the genetics are a bit unpredictable, but that makes breeding
so much more exciting. (For info on how to plant these seeds, google it or wait for another article sometime in the future ... petunia seeds are a bit harder to make grow, but you definitely can do it!)
 |
| Figure 17: Mature seed "pod" that has burst |
 |
| Figure 18: New breed petunia seeds |
This is what my "new breed" petunia seeds turned into this past summer.


No comments:
Post a Comment